![]()
MOTOR FURG�N SUZUKI CARRY ALL - ST90
AJUSTES DE CORREA Y POLEAS DISTRIBUCI�N
By Luis Muñoz R.
Traducido del manual original
VERSION PRELIMINAR
SIN CONFIRMAR!
|
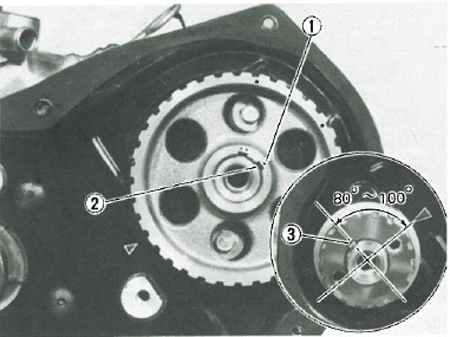
Polea del arbol de levas En un lado de esta polea, en el centro, tiene dos marcas de uno y dos puntos. Un punto o marca "1" - es la marca de un punto - es la referencia para posicionar correctamente en el �rbol de levas. -Montar la polea del �rbol de levas, con las marcas mirando hacia el ventilador. Ver foto. -La marca "1" de la polea va con la chaveta "2" - provista en el �rbol de levas. Precauci�n: Antes de instalar la polea anterior, revise para asegurarse de que la chaveta del cig�e�al (marca "3") est� situada en el rango entre 80 � a 100�, como se muestra en la fig. 3-137.
.
|
Camshaft timing belt pulley One side of this pulley has a punch mark 1 - it is a point mark - as the reference for correctly positioning it on the camshaft. Fit the pulley to camshaft, bringing the punch-marked side to fan side and locating the mark 1 at the keyway 2 - provided in the camshaft. Caution: before installing the pulley as above, check to be sure that crankshaft keyway "3" is in 80� - 100 range, as shown in fig. 3-137. |
|
Correa de distribuci�n (ajuste de sincronizaci�n de v�lvulas) Una secuencia determinada se debe seguir para la instalaci�n de la correa de distribuci�n. Aqu� est� la secuencia: 1) Coloque el rodamiento tensor y el resorte juntos antes de instalarlos como uno todo con la tapa de la correa de distribuci�n. Apretar el tornillo y la tuerca en la medida en que el tensor se pueda mover con la mano f�cilmente.
Nota: Al llevar a cabo el trabajo anterior, aseg�rese de aflojar cada tuerca y cada tornillo de ajuste de las v�lvulas, de modo que el �rbol de levas y la polea puede girar libremente. (soltar v�lvulas las que posteriormente deber�n volver a ajustarse). .
|
Timing belt (valve timing adjustment) A certain sequence must be followed installing the timing belt. Here's the sequence: 1) Put the tensioner and the spring together before installing them as one to the timing belt cover. Tighten the bolt and the nut to the extent that the tensioner can be moved by hand easily.
When carrying out the above job, make sure to loosen each lock nut and then each valve clearance adjusting screw so that the camshaft and the pulley can rotate freely. |
|
2) La polea del �rbol de levas en la parte exterior tiene otros puntos, que se alinean con los del centro. El punto-marca "4", es el que se encuentra en la l�nea con el punto-marca "1" mencionado anteriormente. Ahora, en la tapa de distribuci�n hay una marca en relieve "5". Gire la polea del �rbol de levas a la posici�n en que la marca "4" y la "5" se apunten.
.
|
2) Camshaft timing belt pulley has another punch-mark "4", which is located on the radial line passing through the punch-mark "1" mentioned above. Now, timing belt inside cover has a embossed mark "5". Turn camshaft timing belt pulley to the position where mark "4" meets mark "5". |
|
3) En la polea del cig�e�al hay otra marca en relieve "6". Girar el cig�e�al para que la chaveta de la polea del cig�e�al marca "3" y la marca "6" coincidan.
.
|
3) The inside cover has another embossed mark "6". Turn crankshaft to match keyway "3" of crankshaft timing belt pulley to mark "6". |
|
4) Ahora tiene las dos poleas correctamente relacionados entre s� en sentido angular. Bajo esta condici�n, instale la correa de distribuci�n de tal manera que parte de la correa indicada como "7" est� libre de cualquier holgura.
.
|
4) You now have the two pulleys correctly related to each other in angular sense. Under this condition, put on the timing belt in such a way that portion of belt indicated as "7" is free of any slack. |
|
5) Despu�s de poner la correa de distribuci�n, enganche el resorte en el soporte como se muestra en la fig. 3.142. El resorte, con su propia tensi�n, ajusta la tensi�n de la correa en el valor especificado.
Finalmente girar el cig�e�al hacia la derecha completamente dos veces y apretar el tornillo y la tuerca con el torque especificado.
Nota: -Aplicar THREAD LOCK CEMENT SUPER 1342 (99.000 a 32.050) al tornillo del tensor. -Aseg�rese de primero apretar el tornillo y luego la tuerca. .
|
5) After putting the timing belt, hook the spring on the bracket as shown in fig. 3.142. The spring, with it's own tension, adjust the belt tension to the specified value. Rotate the crankshaft clockwise fully twice and tighten the bolt and the nut to the specified torque. NOTE: -Apply THREAD LOCK CEMENT SUPER 1342 (99000-32050) to the screw part of the tensioner bolt. -Make sure to tighten the bolt first and then the nut. |
|
Precauci�n: Despu�s de ajustar el tensor de la correa, gire el cig�e�al 2 rotaciones en sentido horario para ver si las marcas 1 4 5 6 y la chaveta del cig�e�al "3" siguen alineados en la misma l�nea recta. Si no se alinean repita el proceso para satisfacer este requisito.
|
Caution: After setting the belt tensioner, turn crankshaft 2 rotations in clockwise direction to see if marks 1 4 5 6 and crankshaft keyway 3 locate themselves on the same straight line. If they do not line up repeated to satisfy this requirement. |
|
6) Revise para asegurarse de que la tensi�n est� dentro del rango especificado al empujar la correa en el punto medio entre el �rbol de levas y del cig�e�al.
|
6) Check to be sure that the tension is within the specified range when pushing the belt at the midpoint between camshaft and crankshaft. |